Powered by Hugo (Setting up this blog)
Table of Contents
The urge to blog, I suppose
It seems like some kind of bug has bitten me… Because I’ve decided to build a blog!
Why? Well, a few reasons:
- I’ve never actually built a website (though I have deployed them)
- I wanted to add more personal projects to GitLab/GitHub
- I wanted to learn a front-end framework
Basically, I wanted to dive into some unfamiliar territory. These things might be trivial to a web developer or software engineer, but I’m a systems engineer. For me, this is a chance to work more directly with the underlying pieces instead of just managing the finished product.
There was just one small issue… I didn’t even know how to serve a basic HTML file, let alone work with a full web framework.
But hey! Something being unfamiliar has never stopped me before. So, I went hunting.
The hunt for a framework
The first frameworks I looked into were React and Django. I know Python and am somewhat familiar with Javascript, and I’ve worked with developers on websites that used React. Those sites looked pretty polished to me, so I figured I’d take a look.
And while I’m sure that setup would work, it felt like overkill for a basic website. I’d need to manage both the front end and back end, build or use templates for my React components, and then render everything into a webpage. On top of that, I didn’t need robust database interaction; This was just going to be a blog.
Eventually, I came across Jekyll and Hugo, two frameworks designed specifically for static sites and blogs. Jekyll is written in Ruby, and Hugo in Go. I ended up going with Hugo, purely because it’s written in Go, which is known for being extremely fast!
That way, if my site started to slow down, I’d know it was my fault.
Planning out the pipeline
With a framework chosen, I could finally move into familiar territory: CI/CD.

This was my initial plan: I’d write my blog posts in Visual Studio Code, push everything to GitLab, and then deploy the site in my homelab using Ansible. The server would be fronted by an NGINX reverse proxy to avoid exposing the system serving the Hugo site directly. Plus, NGINX could handle the HTTP security headers that every site should have. Though honestly, I wasn’t too worried about cross-site scripting risks on a static site serving only Markdown files.
That setup had a few significant drawbacks:
-
No CDN – Serving my site directly from my homelab meant that performance would degrade the farther someone was from my physical location.
-
Tied to my IDE – I’d be forced to write posts in my coding environment (or constantly copy .md files into my Git repo). That’s tedious, and not very mobile-friendly for jotting down quick ideas.
-
Network complexity – I’d have to open ports between my core homelab VLAN (where Ansible lives) and the DMZ hosting the public site. Not difficult, but I didn’t feel like poking holes in my DMZ just for convenience. Besides, keeping that zone isolated is something I’m trying to stick to for now.
So, with a mix of security concerns (yes, some are probably just my paranoia), performance limitations, and a desire not to complicate my DMZ, I asked myself: What about the cloud?
A full cloud setup would, at least in theory, solve all of this. Built-in CDN? Check. Public codebase? Already there. Avoiding homelab network adjustments? Definitely.
The real question became: Where do I host the blog you’re reading right now?
My first thought was Azure. I’ve got three Azure-related certifications, so I felt confident I could figure it out quickly. But when I checked the pricing calculator, I was looking at about $13 a month for even the cheapest App Service. Which is cheaper than even a Netflix subscription. But I’d prefer minimal costs for such a basic site. Azure Blob Storage can host static sites too, but I ran into unclear documentation around using a custom domain and uploading my own SSL key.
After some digging, I discovered Netlify. Which is platform built specifically for hosting static sites for businesses and hobbyists alike. Perfect.
Netlify came with its own CDN, support for custom domains, static site compatibility, and even built-in continuous deployment. I could hook it right into GitLab and be done.
Which led to this pipeline:

Simpler… much simpler…
Building the pipeline
So, now that I was going fully cloud-managed, I got to work setting up an account and connecting the web app.
Eventually, I had everything ready and the build process kicked off:
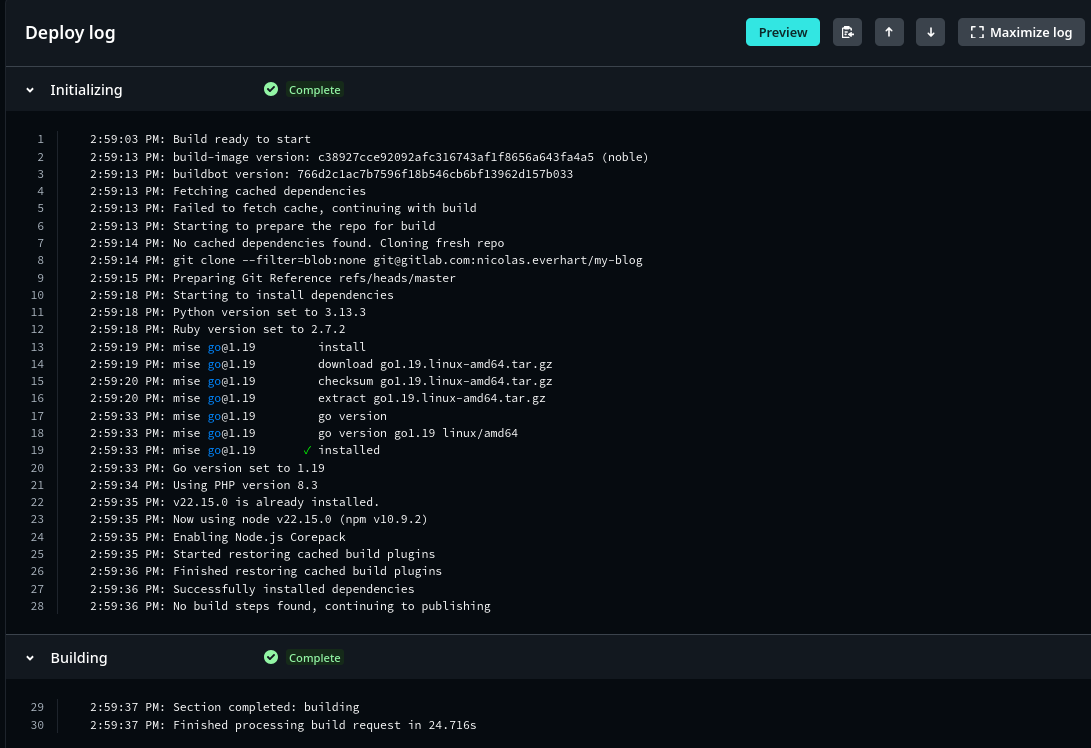
Except… despite using the Hugo template provided by Netlify, for some reason, the build instructions were completely blank. You can even see it mentioned in the logs at line 28. That struck me as odd, considering the build command is just the word hugo. Still, I dug into the documentation and figured out what was missing.
Turned out I needed to explicitly define the build steps in a netlify.toml file at the root of my project. I could have also manually put my build instructions in the web interface of Netlify. But obviously it would be best if the build instructions were in the same place as the code.
Here’s what I added:
[build]
base = "/"
publish = "public"
command = "hugo --gc"

[build.environment]
HUGO_VERSION = "0.123.8"

[context.deploy-preview]
command = "hugo --gc -b $DEPLOY_PRIME_URL"
Once I added that, the pipeline ran smoothly. The logs showed all the same completed steps, but this time it actually built the website into the /public folder as expected.
With the default Hugo site up and running, I picked the hugo-blog-awesome theme by Hugo Sid. Clean, minimalist, simple.
Following the instructions on the GitHub page, I added the theme to my repository as a Git submodule. From the root of my site, I ran:
git clone https://github.com/hugo-sid/hugo-blog-awesome.git themes/hugo-blog-awesome
Then I updated my config.toml file to include:
theme = "hugo-blog-awesome"
To my surprise, that was it. Maybe it’s due to Hugo’s simple and unopinionated design, but it really was just a matter of placing the theme in its folder and updating the config. I’m used to new tools putting up a fight, sending me down a rabbit hole of Stack Overflow posts and obscure GitHub issues. But this? It just worked.
I did make a few tweaks (mainly adding some custom SCSS) and I’ll likely adjust the look more in the future. But overall, this is the result: a blog, built from scratch in an hour or two, using a completely unfamiliar stack.
The takeaway
I wasn’t familiar with Go (aside from briefly experimenting with it), Hugo, or Netlify before this project. But by stepping away from the setup I originally envisioned (Ansible, Nginx, Rocky Linux), I ended up with a solution that’s serverless, completely free, and much more convenient for me as the end user.
The main lesson? Be open to trying new approaches. You might land on a better solution than you originally planned.
I’ll probably stick with this setup moving forward. If I ever need to share something dynamic, like a Grafana board or anything that isn’t static, I’ll host that on Azure or in my homelab.